This article covers the configuration steps for introducing voice mail support into a Skype for Business (SfB) Server 2015 environment by integrating with Exchange Server 2013 Unified Messaging (UM). Note that this series of Exchange integration articles leverages Exchange Server 2013 and will continue to do so for continuities’ sake. Microsoft has recently released to the public the installation package for Exchange Server 2016 for use in on-premises deployments. These articles also apply when using Exchange Server 2016, with one exception related to Instant Messaging integration which will be the next topic addressed in a future article.
The guidance provided here is a more detailed look at what is partially covered in the official TechNet documentation. The following configuration covers generally the same approach used to integrate previous version of Lync Server and Exchange Server which was outlined in this older article. Unfortunately the official documentation is partially incomplete and is also split across the separate product guides for SfB and Exchange Server, making it difficult to understand what is needed for a successful integration. This article will tie all steps into a single set of instructions which can be completed linearly.
One caveat to be aware of is the recommendation to configure UM integration before enabling Instant Messaging (IM) integration with Outlook Web Access. Configuring UM first will enable automatic discovery of the Exchange environment in Skype for Business using the configured SIP domain namespace. Establishing this first will mean that when the IM integration is tackled there will be no need to defined the Exchange Server as a third-party Trusted Application in the SfB topology. If these are configured in the opposite order, meaning that the Instant Messaging integration is performed first, then the setup of Unified Messaging can break the IM integration due to duplicate, conflicting entries for the Exchange Server in SfB. Thus is is recommended to start with UM integration and follow these articles in the order they were posted.
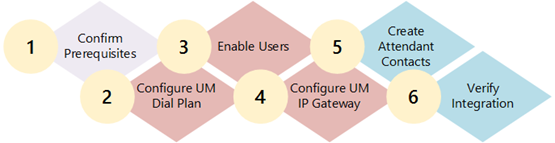
The sections in this article are outlined in the following configuration steps. The steps in red are part of the Exchange Server configuration and the steps in blue are performed on the Skype for Business side.
Assumptions made for the environment used with this article are that Exchange Server 2013 has been deployed with a relatively recent service pack or cumulative update applied. The version used in this guide is Exchange Server 2013 CU8 ( 15.00.1076.009 ).
The prerequisites steps included in this previous article must be completed first to insure that the Partner Application relationship has already been established between Skype for Business and Exchange. Other SfB features provided by Exchange like High Resolution Photos or the Unified Contact Store can be enabled in any order, only after the Partner Application relationship is established.
A long standing best practice surrounding the Exchange Server Certificate has to do with how Lync Server parsed the SSL certificate presented to it by the Exchange Server during establishment of TLS communications. The Lync Server would ignore the certificate’s Common Name (CN) and look at only the Subject Alternative Name (SAN). With further changes coming on how third parties issue SSL certificates it is becoming more common to focus on the SAN field as the CN field will start to become optional, and eventually even defunct. That being said the same best practice to making sure to always duplicate the CN value in the SAN still holds true. Using the Exchange Server certificate wizard to create requests will allow this type of configuration. At this point it is unknown if this limitation has been addressed in Skype for Business Server 2015 but using a properly formatted certificate makes this a moot point.
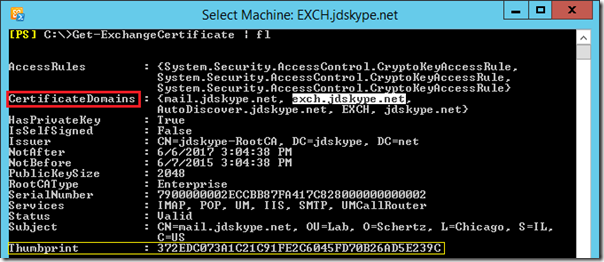
Get-ExchangeCertificate | fl
As highlighted above the Certificate Domains field lists all of the Subject Alternative Names on this certificate which includes the Exchange Server’s FQDN which is critical for UM integration to function. In this example the Subject field shows that the certificate’s Common Name is set to mail.jdskpye.net which is also duplicated in the SAN field. Regardless of what the CN is set to make sure that value is duplicated in the SAN (as per general best practices) and that the server FQDN is included in the SAN field.
This configuration is the most common and allows a single SSL certificate to be used for all roles on the Exchange Server. In more complex environments with separate Exchange UM servers or other configuration it is possible, but not necessary, to use a separate dedicated certificate on the UM service.
Also make note of the Thumbprint value for the desired certificate as it will be used during the configuration in the next section.
The steps in this section are all performed on the Exchange Server using either the Exchange Management Shell or Management Console.

New-UMDialPlan -Name " Chicago " -VoIPSecurity "Secured" -NumberOfDigitsInExtension 4 -URIType "SipName" -CountryOrRegionCode 1
In this deployment the VoIP Security option Secured is used so that both SIP signaling traffic and RTP media traffic will be transmitted between SfB and Exchange using an encrypted TLS communications. Alternatively opting to use the SIP Secured setting would only encrypt the signaling traffic while all media traffic would be transmitted unencrypted.
Additionally a value of 4 is selected for the number of digits in extension numbers on the pattern 312-555-xxxx where the last four digits are treated as the user’s extension.
Set-UMDialPlan " Chicago " -ConfiguredInCountryOrRegionGroups "Anywhere,*,*,*" -AllowedInCountryOrRegionGroups "Anywhere"
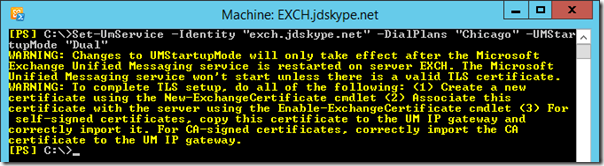
Set-UmService -Identity " exch.jdskype.net " -DialPlans " Chicago " -UMStartupMode "Dual"
Now that TLS is enabled for the UM service the Exchange Server certificate needs to be assigned to the service to support TLS communications for signaling and media.
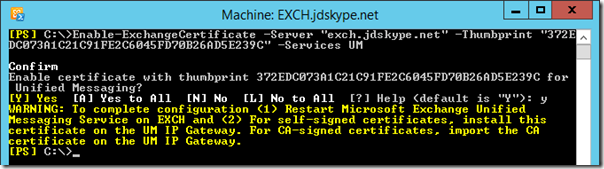
Enable-ExchangeCertificate -Server "exch.jdskype.net" -Thumbprint " 372EDC073A1C21C91FE2C6045FD70B26AD5E239C " -Services " UM "
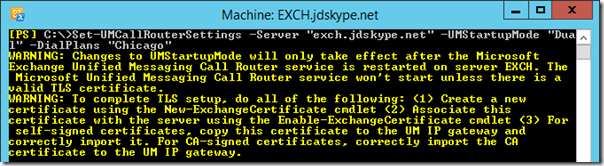
Set-UMCallRouterSettings -Server "exch.jdskype.net" -UMStartupMode "Dual" -DialPlans " Chicago "
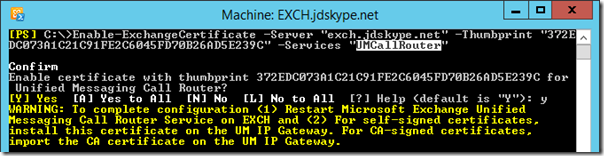
Enable-ExchangeCertificate -Server "exch.jdskype.net" -Thumbprint " 372EDC073A1C21C91FE2C6045FD70B26AD5E239C " -Services " UMCallRouter "
When the new UM dial plan was created the Exchange Server will have automatically created a default UM Mailbox Policy. This object will be named with the label ‘Default Policy” appended to the dial plan’s name (e.g. Chicago Default Policy ).
The TechNet documentation seems to omit this fact and instructs the creation of another UM mailbox policy. A simpler approach is to just modify the default object using the following cmdlet.
Get-UMMailboxPolicy | Set-UMMailboxPolicy -AllowedInCountryOrRegionGroups "Anywhere" -MinPINLength "4" -AllowCommonPatterns $true
As only a single policy exists then instead of querying for and entering the name of the default mailbox policy use the Get-UMMailboxPolicy cmdlet to automatically pass the results to the cmdlet as shown above. Additionally some optional parameters were configured to allow for a four digit PIN to be defined instead of the default 6 digit length. While not recommended for production environments this can be a welcome time saver in lab or test environments.
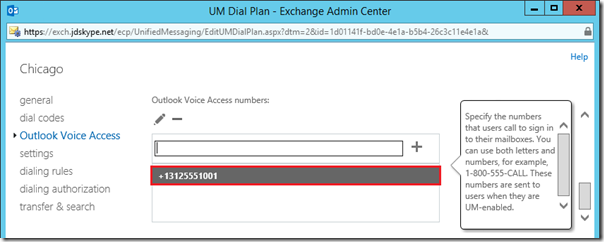
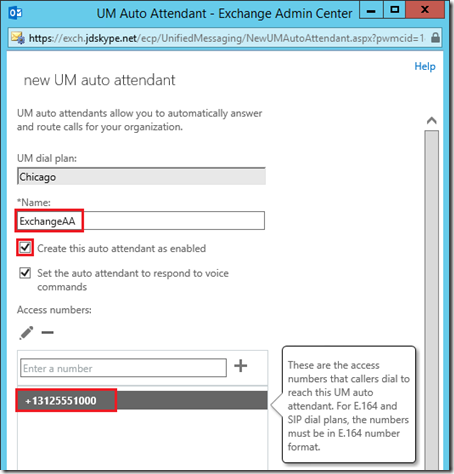
The next step to be performed on the Exchange Server is to define and configure the Auto Attendant and Outlook Voice Access (formerly referred to as ’Subscriber Access’) numbers.
Traditionally Exchange does not do well with spaces in auto attendant names and thus it is still recommended to follow that guidance.
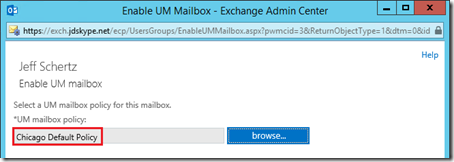
To validate that the UM configuration is functional then at least one user account must be enabled for Unified Messaging. This process can be completed from either the management console or shell.
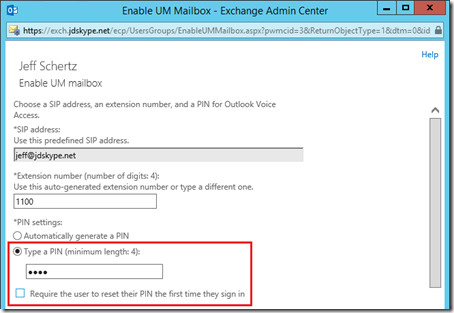
In this example the users extension was pre-populated due to the existence of a defined telephone number in the user’s Active Directory object. Because the dial plan policy was created to use 4-digit extensions then Exchange will automatically take the last 4 digits of the user’s phone number (e.g. 1100 ).
Alternatively the same steps can be performed using Exchange PowerShell cmdlets, so a second account configuration using this process is also covered as an example.

Enable-UMMailbox -Extensions 1101 -SIPResourceIdentifier "steve@jdskype.net" -Identity "JDSKYPE\steve" -UMMailboxPolicy "Chicago Default Policy"
Make sure to enter a unique extension or to omit that parameter if the account’s phone number is already populated with the desired information. The PIN was not manually set on this account which means Exchange will have automatically assigned a random PIN and then sent an email to the user’s mailbox with that information.
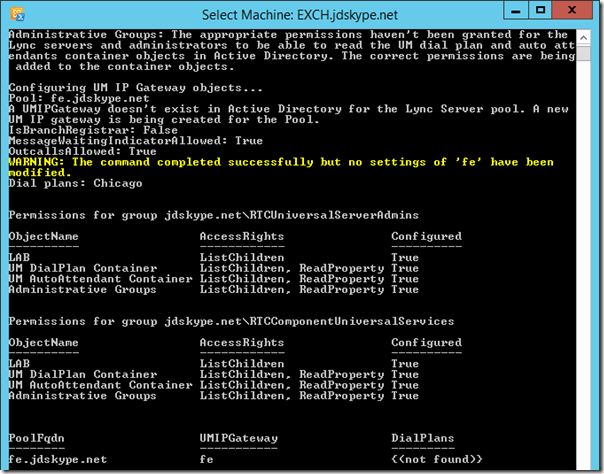
This step is handled by a script which creates the UM IP Gateway and IP Hunt Group as well as grants permissions to Skype for Business Server to read specific UM-related objects in Active Directory.
Make sure to allow for any outstanding AD replication to complete before running this script so that the newly created UM dial plan and any other changes are read by the script in their updated state. If run too soon then sometimes the Dial Plans listed in the last line of the script output will display as “not found” even though the configuration is correct up to that point. If that happens it is safe to simply re-run the script, even multiple times if needed, as it will identify any previously successful configuration and thus report that no new changes were applied in those cases.
cd "C:\Program Files\Microsoft\Exchange Server\V15\Scripts"
C:\Program Files\Microsoft\Exchange Server\V15\Scripts>.\ExchUCUtil.ps1
Note that in this example the Skype for Business Front End server shown at the bottom of the script output displays “ <(not found)>” for the DialPlans field. The value should be displayed as the UM Dial Plan name (e.g. Chicago ). As mentioned above this can usually be resolved by going back and re-executing the script after a few minutes have passed.
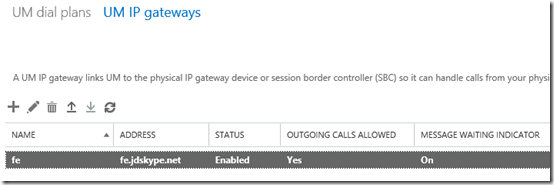
To validate the creation of the UM IP Gateway open the Exchange Management Console and then navigate to the Unified Messaging > UM IP Gateways section. Refresh the page if the new gateway does not appear at first.
With the configuration now complete on the Exchange Server the remainder of the steps in this article are performed on the Skype for Business Front End server.
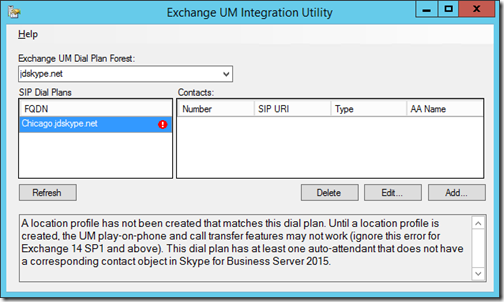
The OcsUmUtil.exe utility is still used to create the Active Directory contact objects for Skype for Business Server to resolve and locate the Exchange Outlook Voice Access and Auto Attendant services.
In older versions of Exchange Server it was required to create an Enterprise Voice Dial Plan in OCS/Lync that matched the exact FQDN of the Exchange UM Dial Plan. Since the release of Exchange Server 2010 SP1 this is no longer required as indicated by the informational text at the bottom of the utility. The UM Dial Plan will be automatically discovered and thus no additional Enterprise Voice configuration is required on the SfB Server to enable UM integration.
C:\Program Files\Common Files\Skype for Business Server 2015\Support
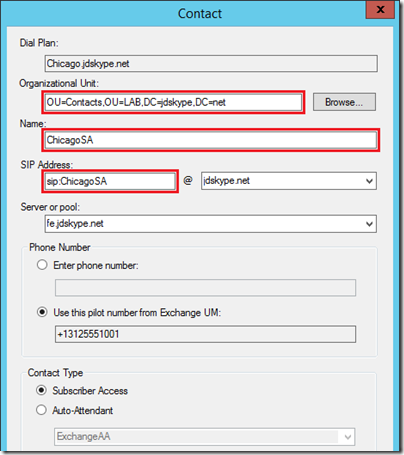
While the remainder of the fields can be left with the default entries it is a common practice to change the SIP Address to a less confusing SIP URI. In this examples the default value (e.g. Chicago.jdskype.net@jdskype.net) has been changed to a simpler string (e.g. ChicagoSA@jdskype.net ) .
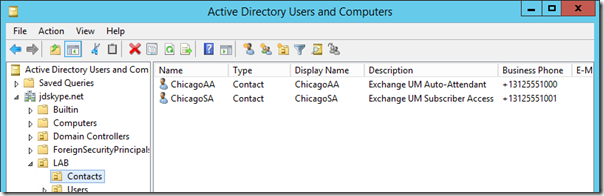
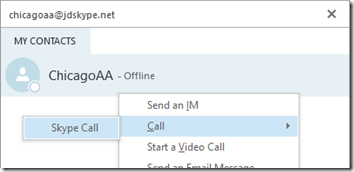
Just as before either retain the default SIP address or edit it to use a customized address as shown in this example (e.g. ChicagoAA@jdskpye.net ).
Now that the integration on both server platforms is complete the final step is to test UM connectivity between Exchange and Skype for Business.
At this point one of two things will occur: the call will work or it will not. If the integrated voice response is “Thank you for calling Microsoft Exchange auto attendant” then the integration was successful. If not then the following common issues could be the root cause.
If the call fails without any response from the Exchange UM Server then one of the most common reasons, other than a simple configuration mistake, could be that the Exchange UM IP Gateway configuration script did not complete as mentioned earlier in this article.
Log Name: Lync Server
Source: LS Exchange Unified Messaging Routing
Event ID: 44008
Task Category: (1040)
Level: Error
Keywords: Classic
Computer: FE.jdskype.netDescription:
Dial Plan UnknownDialplan [Chicago.jdskype.net] is not recognized by routing application
Cause: Dial plan does not exist, or Skype for Business Server 2015 does not have permission to read the relevant Active Directory objects.
Resolution:
If the dialplan is valid, then run exchucutil.ps1 in appropriate Exchange forest to give permission to Skype for Business Server 2015. If the dialplan is not valid, then clean up proxyAddresses attribute for the affected users.
If this message exists then this is an indication that the ExchUmUtil.ps1 script that was run earlier did not configure the UM IP Gateway correctly. As pointed out earlier the script may have failed to associate the UM Dial Plan to the gateway, thus causing this error on the Skype for Business server. Return to that step to re-run the Exchange script and validate that the dial plan is displayed correctly, which should clear this error and then allow for calls to reach the UM attendant services.
If the call successfully connects to the attendant but an unexpected response is heard then this could point to a different issue. If the interactive voice response was “Please call back later. Goodbye.” then this typically occurs when the UM configuration is brand new and the server has not yet had a chance to generate the grammar speech files. As documented in this blog article the pending generation process can be expedited by restarting the Exchange Mailbox Assistants service.
Log Name: Application
Source: MSExchange Unified Messaging
Event ID: 1613
Task Category: UMCore
Level: Information
Keywords: Classic
Computer: EXCH.jdskype.netDescription:
Speech grammar generation started for "Enterprise". Run ID: "7a97b157-b74f-4a21-b667-faf56e85f047", Recipient type: "User"
At this point a call to the Auto Attendant should result in the proper welcome message.
This concludes the setup of Exchange Unified Messaging with Skype for Business Server 2015. If following along with this entire series of Exchange Server integration articles for Skype for Business 2015 then at this point the Partner Application has been established and leveraged to enable High Resolution Photos and now Unified Messaging.
Future articles will address Instant Messaging integration with Outlook Web Access as well as other features like IM archiving and enabling the Unified Contact Store.
Hi Jeff, Thanks for the article. I am trying to configure this but have hit a snag. My CAS and Mailbox roles are on separate boxes, I can see when SfB tries to connect to the UM service (using Wireshark) it is trying to connect to the Mailbox server rather than the CAS server, the mailbox server does not appear to be listening on port 5061 (which seems to be by design). Do you know why SfB would be trying the MB server rather than the CAS? Something it found from the autodiscover maybe? Thanks, Stephen
Kyle says:Hi Jeff, thanks for another great blog post. I followed your article to the t but still running in to issues. When a incoming call is transferred to UM for voice mail I get “busy” signal. On the lync front end I see the following. I assure you, we have a server assigned to the dialplan. Error isn’t much help. Attempts to route to servers in an Exchange UM Dialplan failed No server in the dialplan [CGYUMDP.pmclp.local] accepted the call with id [211685c7-d200-482d-ae77-a34adbab6189].
Cause: Dialplan is not configured properly.
Resolution:
Check the configuration of the dialplan on Exchange UM Servers. On the Exchange UM there is nothing in the event logs. Certificate assigned to exchange UM service and um call router has CalVS1233.contoso.local as the common name as well in the subject alternative name. on the lync side we specified port 5067 for tls and 5060 for tcp as listening ports. Because of this I did change change the UM Call Router Settings for TLS listening port to 5067 to match Lync. From s4b logging I see the following “The peer actively refused the connection attempt” peer being the Exchange server. Also I see the frontend is trying to send to exchange over port 5061. Running netstat I see nothing is listening on 5061 on our exchange server. Any suggestions or advice on what the problem might be would be greatly appreciated. Thanks Jeff. KDS
Resolved. Under UM Server settings you can configure the port for UM Call Router Settings for TLS Listening port. The pop up in EAC when doing the hover over says “Enter the TLS listening port configured on the VoIP gateway, IP PBX, or Lync server.” Our TLS listening port is set to 5067 so naturally one would think that this must need to change to 5067. However, if you do change this it changes the what port the UM Call routing service listens on, I don’t think it has anything to do with what TLS listening port lync /S4B is set to. Confusing and misleading. Once I changed the port back to 5061 and restarted um services voice mail started working.
Jeff G. says:Great article. Have two questions though, We have Multiple Exchange servers, all multirole, load balanced. Do you have to assign one of them as the UM Call router by FQDN or can you assign a common load balanced name for it?
Second. We already have UM working with our Avaya Aura system and are migrating to Skype for Business. Can you use the same OVA number and Autoattendant with multiple Dial Plans? We have one for Avaya, unsecured and will obviously need a second for Secured. Do I need to identify another number for OVA for this dial plan? Another AA?
Are calls able to route from Exchange Auto Attendant back into the Skype enviromment? i.e. go from PSTN -> Skype -> Exchange Auto Attendant, where a user types in an extension they want to dial to talk to someone. I’m trying to get it working but am not having much luck, and fundamentally i’m not convinced it’ll work.
Jeff Schertz says: Yes that should still function in a SfB Server environment. Eddy says: Hi micheal, Did this scenario work out for you? Ayman says: Thank you for this amazing article especially the “Call Failure” part Jason says:Jeff, This comment isn’t entirely relevant to this post, but it’s along the same vein. I’m still running Lync 2013 and Exchange 2013. My boss wants to go to Exchange 2016 (we don’t have any plans to change Lync to Skype for Business 2015 for now). I’ve been able to find a couple of people asking if Exchange 2016 will work with Lync 2010/2013, but haven’t found any answers. Do you know if Lync 2013 and Exchange 2016 will play together nicely? Perhaps more importantly… do you think MS would support this environment, since as of writing this comment the various TechNet articles discussing compatibility only mention Exchange 2013?
Jim says:Hi Jeff,
This article was excellent as per your usual. I just wanted to offer an additional scenario. We recently upgraded to Skype for business 2015 and Exchange 2016. Doing the exchange part broke our UM auto attendant due to certificate issues. Our exchange server has a public certificate based on our external domain (ex: mail. contoso.com) but Lync/Skype4B only wants to address your exchange server by its internal domain name which for us is based on a “.local” root so we couldnt use that same certificate for the UM services. What we did:
If the internal domain is something that cannot be registered with public certificate authorities such as a “ex1.contoso.local” the fix is to create a separate certificate request in exchange just for your exchange internal AD name “ex1.contoso.local” (I just used the exchange admin console, dont select Self signed and delete all the other host domain names in that request) and submit it to your Windows Cert Server (Web Server template) then download it from the certsrv and complete the install in the exchange server.
Then use that certificate for Jeff’s instructions on assigning the 2 UM services on the Exchange Server. (I suppose if the Lync server isnt in your internal domain then additionally you would want to install the windows root certificate on the Lync server but that isnt necessary if both servers belong to the same internal .local domain. For Edge and RPX servers I also imported the window root chain certificate but thats for trusting the Lync server I believe.) Because Microsoft no longer recommends using internal root domains like .local, due to the issues of working with public certificate authorities, it is difficult to find tutorials that deal with our scenario even though there must be 100 of thousands of domains based on .local (Small Business Server was the biggest culprit). Unfortunately migrating a domain that was originally built using “.local” to a public domain one can be daunting in networks with a lot of servers. Anyhow Jeff feel free to correct me on any of my statements, I know you already get all of this, I am just hoping this note would help others in my scenario who want to see that example.
Hi Jeff Schertz! We’re implementing SFB 2015 in our company, but users that have the same email address have their contacts merged by the client when they shouldn’t have.
We have two kinds of users: employees and outsourced collaborators. Due to legal reasons, the outsourced collaborators cannot have an individual email address on our Exchange server, so people who work in a same sector get to share a common mailbox. Say John is an employee at dev, so his default email address is john@example.com. Jack and Moe work alongside John, but they’re outsourced, so they share the mailbox devs@dev.example.com (yes, they get a subdomain, but that shouldn’t matter here).
John, Jack and Moe all got registered on **** with their UPN’s, which are created from their corporate ID’s. The ID’s have no relation with email addresses, being numerical. When they were registered, their SIP addresses were also generated from their UPN’s. So, they all can log onto **** with their UPN’s, like 1101@example.com, 1102@example.com, and 1103@example.com.
The problem arises when we search for them on the **** client. John shows up just fine. However, when we search for Jack, we get Moe. The client thinks they’re the same contact because they have the same email. It seems to me the WindowsEmailAddress AD attribute gets copied to the mail attribute on the **** address book. (Please note I’m no AD expert.)
Deleting contacts from Outlook or Exchange is not an option for us. Neither is changing the way the email addresses are linked to outsourced collaborators, due to the legal reasons mentioned above.
What we tried so far:
Tuned the Global client policy server-side: AddressBookAvailability changed to WebSearchOnly;DisableEmailComparisonCheck changed to True
Fooled around with ABSConfig:
Set proxyAddresses attribute to ProxyAddresses- Tel Only;
Tried to make the Address Book ignore mail addresses, setting mail to blank; we had no success with that, because running ABServer against the raw address book files displays the mail field on all users that have an email address, whether they’re employees or outsourced
I’ve seen solutions to a similar problem, but the thing here is we’re not supposed to touch Exchange or Outlook. Is there a way to stop the clients from merging users based on their emails?